 Cart
CartMany recipes (including the directions for making our scones and biscuits) call for using chilled or frozen butter.
Lets face it–frozen butter is. . .cold. Hard. Difficult to slice, and difficult to work with. It is SO much easier to work with butter that is warmed to room temperature, or even melted. So WHY make the extra effort and time and use frozen butter?
Lauren Chattman, author of The Baking Answers Book, says the point in using chilled butter is so that it doesn’t melt during dough assembly. Let the butter melt in the oven, not on your kitchen counter. AND frozen butter takes up more physical space than melted butter. When it melts during baking, it creates an air pocket. The melting butter also releases steam, and that helps expand the air pocket, which ultimately helps the dough rise. What happens if the butter melts before being placed in the oven? You lose those pockets of air and steam, the dough doesn’t rise well, and you have denser scone or biscuit.
Start with a chilled bowl, which keeps everything cold. Add the dry ingredients to the bowl, and cut in cold or frozen butter. There are two easy ways to do this. One is with a mixer or food processor. The second is to pre-grate and freeze the butter, and then use a pastry cutter.
If you use the food processor or mixer, pulse or run it until most of the butter is broken down to rice-size pieces. Then gently stir in the COLD buttermilk, quickly pat out the dough and cut your scones. I add the buttermilk by hand, rather than with the mixer. No matter how careful I am, the mixer overworks the dough. It only takes an extra minute or two to add the liquid by hand, but it makes a big difference in the lightness of the scones.
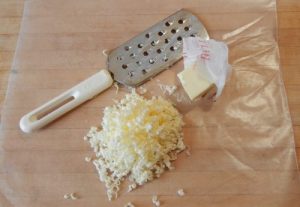 The second way to cut in frozen butter is to grate the needed amount of COLD butter, wrap it up gently, and freeze it. When you want to make scones, add the frozen grated butter to your bowl, and use a pastry cutter to cut it into the dry ingredients. This happens quickly and efficiently, and is only method I use to cut in frozen butter. Finish dough assembly by adding your buttermilk, gently patting out the dough and cutting your scones.
And then–FREEZE the DOUGH. When you are ready to bake, preheat your oven. Once preheated, line a cookie sheet with parchment paper, and remove the dough from the freezer. Put the frozen scones or biscuit on a cookie sheet, and put it in the oven. In a very few minutes, you can be enjoying gloriously light scones or biscuits!
I made blueberry scones this morning with frozen butter and while baking the butter melted on the baking sheet and it was almost like they were baking/frying in the butter. This has never happened to me before. I transferred them to another baking sheet and seem to be better. Can you shed some light on the reason why this would happen?
the recipe I used was:
4 cups flour
1 cup sugar
1 tbsp B. Powder
pinch salt
10 tbsp frozen butter shredded
1 cup buttermilk (it took 1/4 c more)
2 eggs
vanilla
Marianna–that specific recipe is not one I am familiar with, but I can take a couple of educated guesses. First–with the frozen butter, I am not surprised that it needed extra buttermilk–the flour absorbs liquids less readily when it is icy cold. But I am thinking that the eggs and vanilla and potentially even the buttermilk weren’t icy cold–so the dough (and the butter) warmed up slightly over time. You don’t state your baking temperature–was it in a hot oven (more than 400 degrees?) or lower. If lower, it causes a slower bake, which would have let the butter melt before the dough started baking.
One way to test all this is to follow the recipe again, but then tuck the dough (pre-cut into scones) into the freezer for at least 30 minutes prior to baking. While they are chilling down again, preheat the oven, then put the scones on a fresh sheet of parchment paper and straight into the hot oven.
I hope these suggestions help you sort out the problems–your scones sound delicious!