The Art of Quick-Bread Baking

buttermilk biscuits
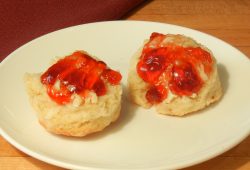
Muffins, scones and biscuits all fall into the category of ‘quick breads’. However, don’t be confused, they are NOT breads, and they use completely different skills and techniques.

If I had to distill my advice on quick breads down to one or two comments only, it would be this:
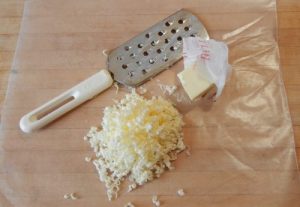
1.  For scones and biscuits–cut in frozen butter. Then add the buttermilk quickly, while handling (mixing) the dough as little as possible.
2.  For muffins–first, blend or cream the butter, sugar and eggs thoroughly. Then, when adding the flour and dry ingredients–do this as gently and minimally as possible.

WHY?  Here is what ultimately separates bread baking from quick bread baking. When you make bread, the more you knead the dough the better it becomes.  But with quick breads the more you ‘work’ the dough or batter, the tougher and more rubber-y it becomes.  The reason is the same for all, and the culprit is gluten.  Bread thrives on well-developed gluten to give it its structure and characteristic ‘chew’. Gluten develops as you knead the dough.  When you make quick breads, you do NOT want gluten to form. Thus, you handle or ‘work’ the dough or batter as little as possible.

How does this translate into practice? It means that when you make quick breads, you work the liquid and dry ingredients together by hand, with a spatula. Run your spatula around the bowl and along the bottom, scooping from the bottom and bringing it up to the top to be sure that the dry ingredients get combined into the liquid.  Continue doing this until the dough/batter JUST begins to come together–and quit!

Fill the muffin tins–or turn the scone/biscuit dough out onto a floured board and cut your scones. Done!

Baking Temperature-when hot is TOO hot!

In checking voice mail messages one evening, I had a message from someone who was clearly upset. She left a message asking about the baking temperatures listed in our directions. She thought the temperature listed was too hot.

I called and asked her what had happened. She’d made the dough and baked all the scones. The bottoms of all her scones were either scorched or burned. I told her that the baking temperatures were correct as listed, but did she have time for me to ask her a few questions. I was reasonably sure I knew what had happened, but you know what they say about assumptions.

My questions were:
1. Did the parchment paper turn tan? (YES)
2. Did you make up the dough, cut the scones and put them on the cookie sheet to bake, and then begin pre-heating the oven? (YES)
3. How cold was the butter when you started making the dough? (refrigerator temperature)

The primary issue here is the answer to question 1. The fact that the parchment paper turned tan is a good indicator that the oven was running hot. I don’t know why many ovens, mine included, age this way, but they do. As they age, they may run true to temperature in the mid-temperature ranges, but as you get higher than 400 degrees, will run too hot. The easy solution for this is to purchase an oven thermometer and do some simple checking of your oven settings. For my oven, I set the temperature back 20 degrees to 405, and now my scones bake correctly.

There were other factors, however, which contributed to the problems with her scones. Letting her cut scones sit on the parchment paper while the oven preheated gave the butter time to warm and seep into the parchment paper. Likely there was a nice buttery spot under each scone before those scones went into the oven. As soon as the heat hit that spot, the butter scorched, causing the bottoms to burn. (And by the way, she did NOTHING wrong by starting with refrigerator temperature butter. While even colder butter is better, the real problem was the time spent waiting to for the oven to preheat.)

If you find out that you forgot to start the oven preheating, just pop the scones into the freezer while the oven heats, and then replace the parchment paper with a fresh sheet before baking.

Here are a few “ounce of prevention” baking tips:
1. If you are baking something for the first time, bake as few as possible for the first batch, and set the timer for the minimum time called for by the recipe. This lets you make sure both the temperature and time settings are accurate.

2. If you are baking one cookie sheet of scones, cookies, or biscuits–set the rack to the central position in the oven.

3. If despite your best efforts they still scorch slightly, double up your cookie sheet. Just the little bit of extra insulation on the bottom does wonders!

As for my unhappy caller–it is always disappointing to take out your finished creation and discover it not what you anticipated. Creative thinker that this woman is, she sliced off the bottoms of the scones, served them anyway, and explained that they were lower in calories without the bottom crust!! And since the first words out of my mouth had been “we need to replace that bag for you”, I’m now looking forward to hearing about her next batch of scones!

Frozen Butter and Scone Dough–some Chilling Facts

Many recipes (including the directions for making our scones and biscuits) call for using chilled or frozen butter.

Lets face it–frozen butter is. . .cold. Hard. Difficult to slice, and difficult to work with. It is SO much easier to work with butter that is warmed to room temperature, or even melted. So WHY make the extra effort and time and use frozen butter?

Lauren Chattman, author of The Baking Answers Book, says the point in using chilled butter is so that it doesn’t melt during dough assembly. Let the butter melt in the oven, not on your kitchen counter. AND frozen butter takes up more physical space than melted butter. When it melts during baking, it creates an air pocket. The melting butter also releases steam, and that helps expand the air pocket, which ultimately helps the dough rise. What happens if the butter melts before being placed in the oven? You lose those pockets of air and steam, the dough doesn’t rise well, and you have denser scone or biscuit.

Start with a chilled bowl, which keeps everything cold. Add the dry ingredients to the bowl, and cut in cold or frozen butter. There are two easy ways to do this. One is with a mixer or food processor. The second is to pre-grate and freeze the butter, and then use a pastry cutter.

If you use the food processor or mixer, pulse or run it until most of the butter is broken down to rice-size pieces. Then gently stir in the COLD buttermilk, quickly pat out the dough and cut your scones. I add the buttermilk by hand, rather than with the mixer. No matter how careful I am, the mixer overworks the dough. It only takes an extra minute or two to add the liquid by hand, but it makes a big difference in the lightness of the scones.

how to make scones with frozen butter--grating butter firstThe second way to cut in frozen butter is to grate the needed amount of COLD butter, wrap it up gently, and freeze it. When you want to make scones, add the frozen grated butter to your bowl, and use a pastry cutter to cut it into the dry ingredients. This happens quickly and efficiently, and is only method I use to cut in frozen butter. Finish dough assembly by adding your buttermilk, gently patting out the dough and cutting your scones.

And then–FREEZE the DOUGH. When you are ready to bake, preheat your oven. Once preheated, line a cookie sheet with parchment paper, and remove the dough from the freezer. Put the frozen scones or biscuit on a cookie sheet, and put it in the oven. In a very few minutes, you can be enjoying gloriously light scones or biscuits!