Cart
CartFrozen butter vs. Cold Butter. It matters.
I confess. For years I made these scones prior to starting Victorian House Scones, and did not use frozen butter. Did I use cold butter straight from the fridge? Yes, but more often it was cool butter that sat on the counter for 10-15 minutes. After all, it is SO much easier to cut it in when it is just slightly cooler than room temperature vs. COLD. And my scones? They were, of course, very good. Sometimes even excellent. But were they outstanding? Not very often. Then I started working with frozen or nearly frozen butter. The difference is remarkable, and it is remarkable enough that I’m becoming the poster child for frozen butter.
So the question is: How do you get frozen butter into the mix without slicing your fingers to shreds? Or without ending up with an aching arm because it was so difficult to work in the icy cold butter? I have two recommendations–both work equally well, so the choice is yours.
1. Use your mixer. If you own a stand mixer such as a KitchenAid, you can use the mixer to work pats of butter into the flour mixture. Add the pats of butter to the bowl containing the mix. Then attach the flat paddle and turn the mixer on low. It will quickly and easily work the butter into the flour mixture, leaving you with small nubbins of butter. The overall texture will resemble coarse corn meal.
It is very difficult to safely slice a stick of frozen butter. Instead, take the butter out of the refrigerator, cut it into pieces, and then freeze the butter in single recipe portions. When you are ready to bake, the butter will be waiting for you.
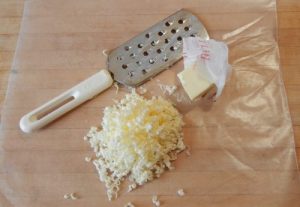
2. OR–use your cheese grater. Grate up the proper amount of butter for a batch of scones (1-1/2 sticks for a retail bag, 3 sticks for a commercial bag), onto a sheet of wax paper. Wrap it up gently and place the grated butter in the freezer for a at least 20 minutes. You can grate several recipe-size batches of butter in advance, wrap them, and freeze them for future use. When you are ready to bake, take out a package of grated butter and add it to the dry ingredients in the mixing bowl.
 Once the grated butter is in the mixing bowl cut it in with a pastry cutter. It takes less than 10 passes to fully work the butter into the flour mixture. This technique is truly amazing!
No matter how you choose to incorporate the butter, the next step is adding the liquid. Gently blend the buttermilk into the butter/mix blend. Be very careful not to over-work the dough.
One word of caution–using very cold butter and cold buttermilk seems to result in a need for additional buttermilk to get all of the flour/butter blend moistened and worked into a ball. This is normal–so slowly add (by tablespoons) enough buttermilk to achieve a workable ball of dough.