Freezing scone dough or biscuit dough prior to baking is one of the most important things to do if you want light and tender scones or biscuits. Other critical steps include using frozen butter, and handling or working the dough as little as you possibly can.
Why should you freeze scone dough or biscuit dough?
By freezing scone dough or biscuit dough prior to baking, several nice things happen. Freezing the dough prior to baking keeps the butter solid and firm, which helps create light and tender scones and biscuits. Having the butter stay solid until you bake also means that the scones and biscuits will rise, rather than spread on the cookie sheet.
Freezing scone dough or biscuit dough prior to baking also has the advantage of allowing the dough to ‘rest’ and the gluten to relax, again helping to create light scones and biscuits.
So how, exactly, do you freeze scone or biscuit dough??
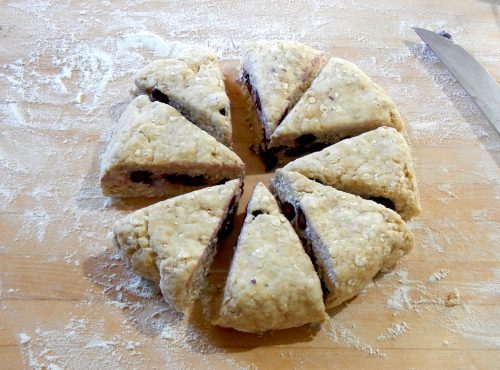
Once your dough is made, with any and all of the goodies you are adding to your scones or biscuits (fruits, spices, nuts, etc.), divide your dough as directed and pat out each piece into a round of dough ~6″ in diameter, and 3/4-1″ thick.

Cut your dough with a long sharp knife (such as a long vegetable chopping knife). Please note the key word sharp. You want to make clean cuts through the dough, and not drag the top of the dough down through the cut surface. If you are using a round biscuit cutter, the same principle applies. Use a cutter with a sharp lower edge, and press straight down–do NOT twist.

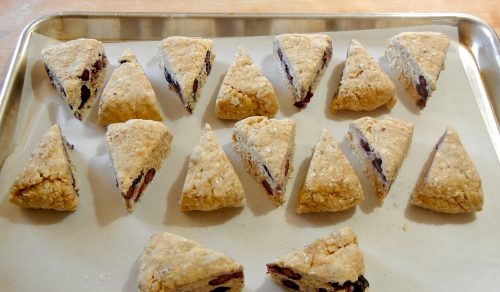
Lay your cut scones or biscuits on a cookie sheet, and place directly in the freezer. You may gently cover it with some plastic wrap or lay a sheet of parchment paper over the top. Do not press your covering layer into the dough–it will be fine left unwrapped, even overnight.
Once the dough is firm, get a freezer safe bag and label the front with indelible marker. Include the date (this is important!) as well as the flavor name. Add the baking temperature and approximate time so you don’t have to look up this information later.
Remove the frozen dough from the cookie sheet and place into the freezer bag. Bleed out the air, and return the labeled bag to the freezer. Mark the calendar–you have 3-4 weeks to use the dough.
And now–how do I bake?
Preheat your oven to 425 degrees. IF your oven runs hot, drop the temperature down 10-15 degrees. You never want to drop below 400 to bake, as both scones and biscuits need a fast, hot bake.
Once the oven is hot, line a cookie sheet with parchment paper. Go to the freezer and remove as many scones or biscuits as you want to bake. Sprinkle with cinnamon sugar, sugar crystals, or flavored sugars if desired. Place immediately into the oven.
You do NOT want to thaw the dough before it goes into the oven. There are two reasons for this. Scones and biscuits have a high butter content and we want the butter to melt IN the oven, not before. If the butter starts to melt before you put the dough in the oven, it will soak into the parchment paper. Once the scones and biscuits start to bake, the melted butter will scorch and then burn. The result–black bottom scones or biscuits!
Set your timer for the MINIMUM baking time you need. Generally I find frozen scones and biscuits need 18-19 minutes to bake, so I set my timer for 15 minutes. I can quickly check the progress, add a couple of minutes, and stay nearby. When the timer goes off a second time, do another quick check for done-ness and add another minute or two as needed. You want them to be just done in the center–not doughy.
You can test for done-ness with the ‘wiggle’ test. When you think they are close to being done, quickly reach in and gently grab the top of a scone and try to wiggle it side-to-side. If it wiggles, it is still doughy in the center. Quickly close the oven door, add a minute or two to your timer and let them continue to bake. Keep adding a minute or two until the center is firm. You do not want your nicely puffed scones or biscuits to collapse as they begin to cool.

 Cart
Cart